
Now that I’ve gotten her windows replaced and room painted (lots of funky, girly colors), my daughter has been asking for a desk to do her school work. “This will be easy,” I thought, “a couple file cabinets and an old door on its side will be perfect!” Not exactly what she had in mind… ah, the difference between boys and girls…
Her vision, with the help of the internet, was a desk with drawers and a hutch and plenty of cubbyholes for stuff (lots and lots of stuff!). So with a handful of Pinterest pictures to go on and some reverse engineering, here’s a model of the desk we’re building.
Step 1 – Build the Desk Frame
Build the frame from 3/4″ plywood. Attach the sides and bottom shelf with pocket holes

Make sure that your desk top extends over the sides by 3/4″.

Add the trim, rear support shelf and the cabinet center partition:

Next, cut the cabinet footer from 3/4″ plywood using a jigsaw or band saw (if you have one!). Attach with nails and wood glue.

For those of you who care, I’ve also created a video of how to draw arcs like this in the 3D modeling software that I use for my plans.

Use finishing nails and wood glue to attach the 3/4″ (3/8″ deep) half round moulding trim around the desktop.

Step 2 – Build the Cabinet Door
There are many different ways to do this depending on the look that you want for the desk. For ours, we’re using rail and stile construction to build a cabinet door. The face of the door can be 1/4″ wood panel (in my model) or you could use a glass panel which would look really nice! Here are the dimensions of the model (constructed to leave a 1/16″ gap between the cabinet door and the drawer faces next to it), however when you are building your project, be sure to measure your cabinet door for the actual dimensions. Plans are one thing, but as careful as you are, sometimes cuts aren’t exactly the same as in our project plans!

Use your table saw with a Freud Dado Blade Set to cut your dados and make tenons on your rails and stiles as seen in this illustration.


Here’s the finished cabinet door with the 1/4″ wood panel in place & outside dimensions:

Lastly, attach the 2 back panels to the desk.
Step 3 – Drawers
This desk has 3 drawers, 2 identical small drawers on top and a large bucket drawer on the bottom. These can be mounted with your choice of hardware, generally either bottom mount 22″ drawer slide or a full extension ball bearing side mount drawer slide.

The drawers are constructed with 1/2″ plywood frames joined with pocket hole screws and a 1/4″ bottom inset into dado grooves for added support. I prefer to construct the bottom that way rather than nail to the bottom of the drawer frame, however if you use bottom mount drawer slides and don’t have a dado blade or router, this will keep the drawer bottoms from detaching because the slides will bear the weight. Also note that there should be 1/2″ clearance on the sides of the drawers so that the slides will fit.
For the drawer construction, first attach 3 sides with wood glue and pocket hole screws.

Slide the 1/4″ bottom panel into the dados. Dados should be at least 1/4″ from the bottom of the drawer frame. It will help to slide the panel in if you sand the edges of the drawer panel to make them slightly thinner than 1/4″. Use wood glue to reinforce the joint.

Attach the 4th side of the drawer with wood glue and pocket hole screws. Remember, your pocket holes should be on the outside of the drawer, not the inside.

Lastly, attach the drawer face, centering the drawer box with the face and box flush at the bottom.

Assemble the other 2 drawers the same way.
Step 4 – Assemble the Hutch
Attach the hutch top to the sides with wood glue and pocket hole screws.

Next, attach the hutch shelves, again with wood glue and pocket holes (on the bottom of the shelves).

Attach the hutch dividers:

Next comes the 1×3″ trim:

Lastly, attach the back panel to the hutch.

The Finished Product!

Finish up with the drawer and cabinet hardware of your choice.
24 replies on “DIY Harbor View Desk & Hutch Knockoff Plan”
Would you recommend using a birch plywood or did you use a veneered plywood?
Hi Brady, I used a sanded birch plywood for this project. However you could use any type you like, though I’d recommend that you use a finished plywood that has a smooth sanded finish.
Thanks,
Ed
How do you attach the hutch to the desk?
Hi Anthony, thanks for the note! I didn’t attach the hutch on my desk, I just placed it on top of the desk and it worked fine, especially if the desk is against a wall. If you want to attach it, you can use some metal brackets from the home improvement store to anchor the hutch. This kind would be hidden in the back – https://www.homedepot.com/p/Everbilt-2-in-Zinc-Plated-Mending-Plate-4-Pack-15299/202033910. Or you could use 90 degree brackets if you wanted to secure in multiple places. https://www.homedepot.com/p/Everbilt-1-in-Galvanized-Corner-Brace-4-Pack-15315/202033896.
Hi, have you got pictures of these as I can’t get access to this page. It’s saying “access denied”.
Thanks.
Hi Shane, which page are you having trouble with? The build post should have detailed pictures of the project.
THanks!
Ed
Hi Ed, it was the two links about the zinc mending plates and galvanised corner braces.
It could be that I’m from the England. So I don’t know for sure if that’s why it won’t let me access it.
I’m trying to get a list made up so I can buy all the materials for this. Just need to get a cost to justify to the misses that it’ll be worth it instead of buying a whole desk that won’t function as well.
Hi Shane, mending plates and corner brackets are generally inexpensive. Here are a couple examples from Amazon of the hardware:
3/4″ Mending Plate
Corner Bracket
Cheers!
Ed
Thank you.
Sorry to bother you again. What’s the length and width of the plywood please?
About how much did this cost?
Lumber prices are going to vary a good bit based on where you are. The project ran me between $250-$300 for the lumber and hardware.
Thanks!
Ed
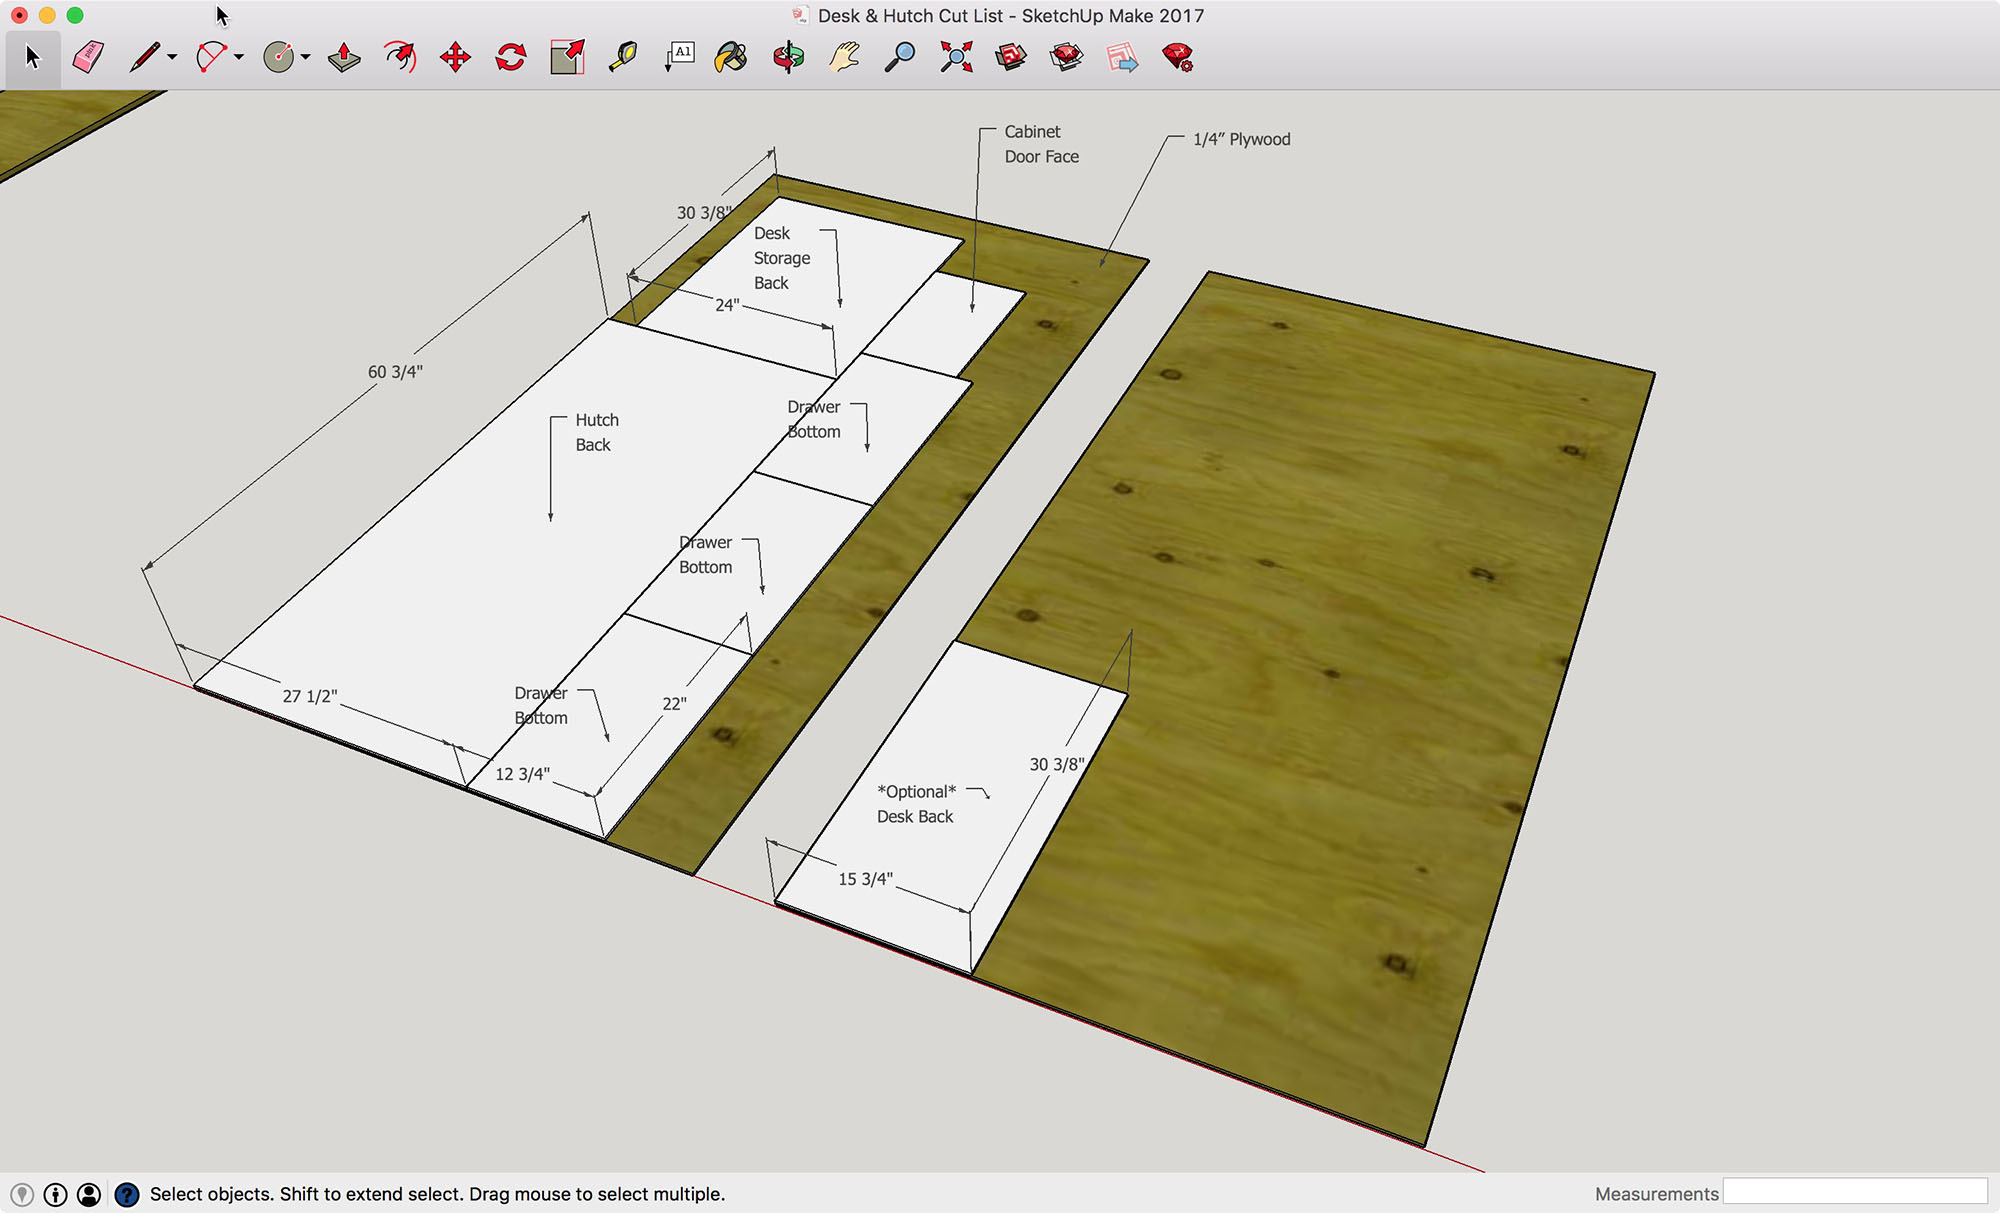
What is the cut lists I cant find them
Hi Mya, Here are the cut lists for the desk & hutch:
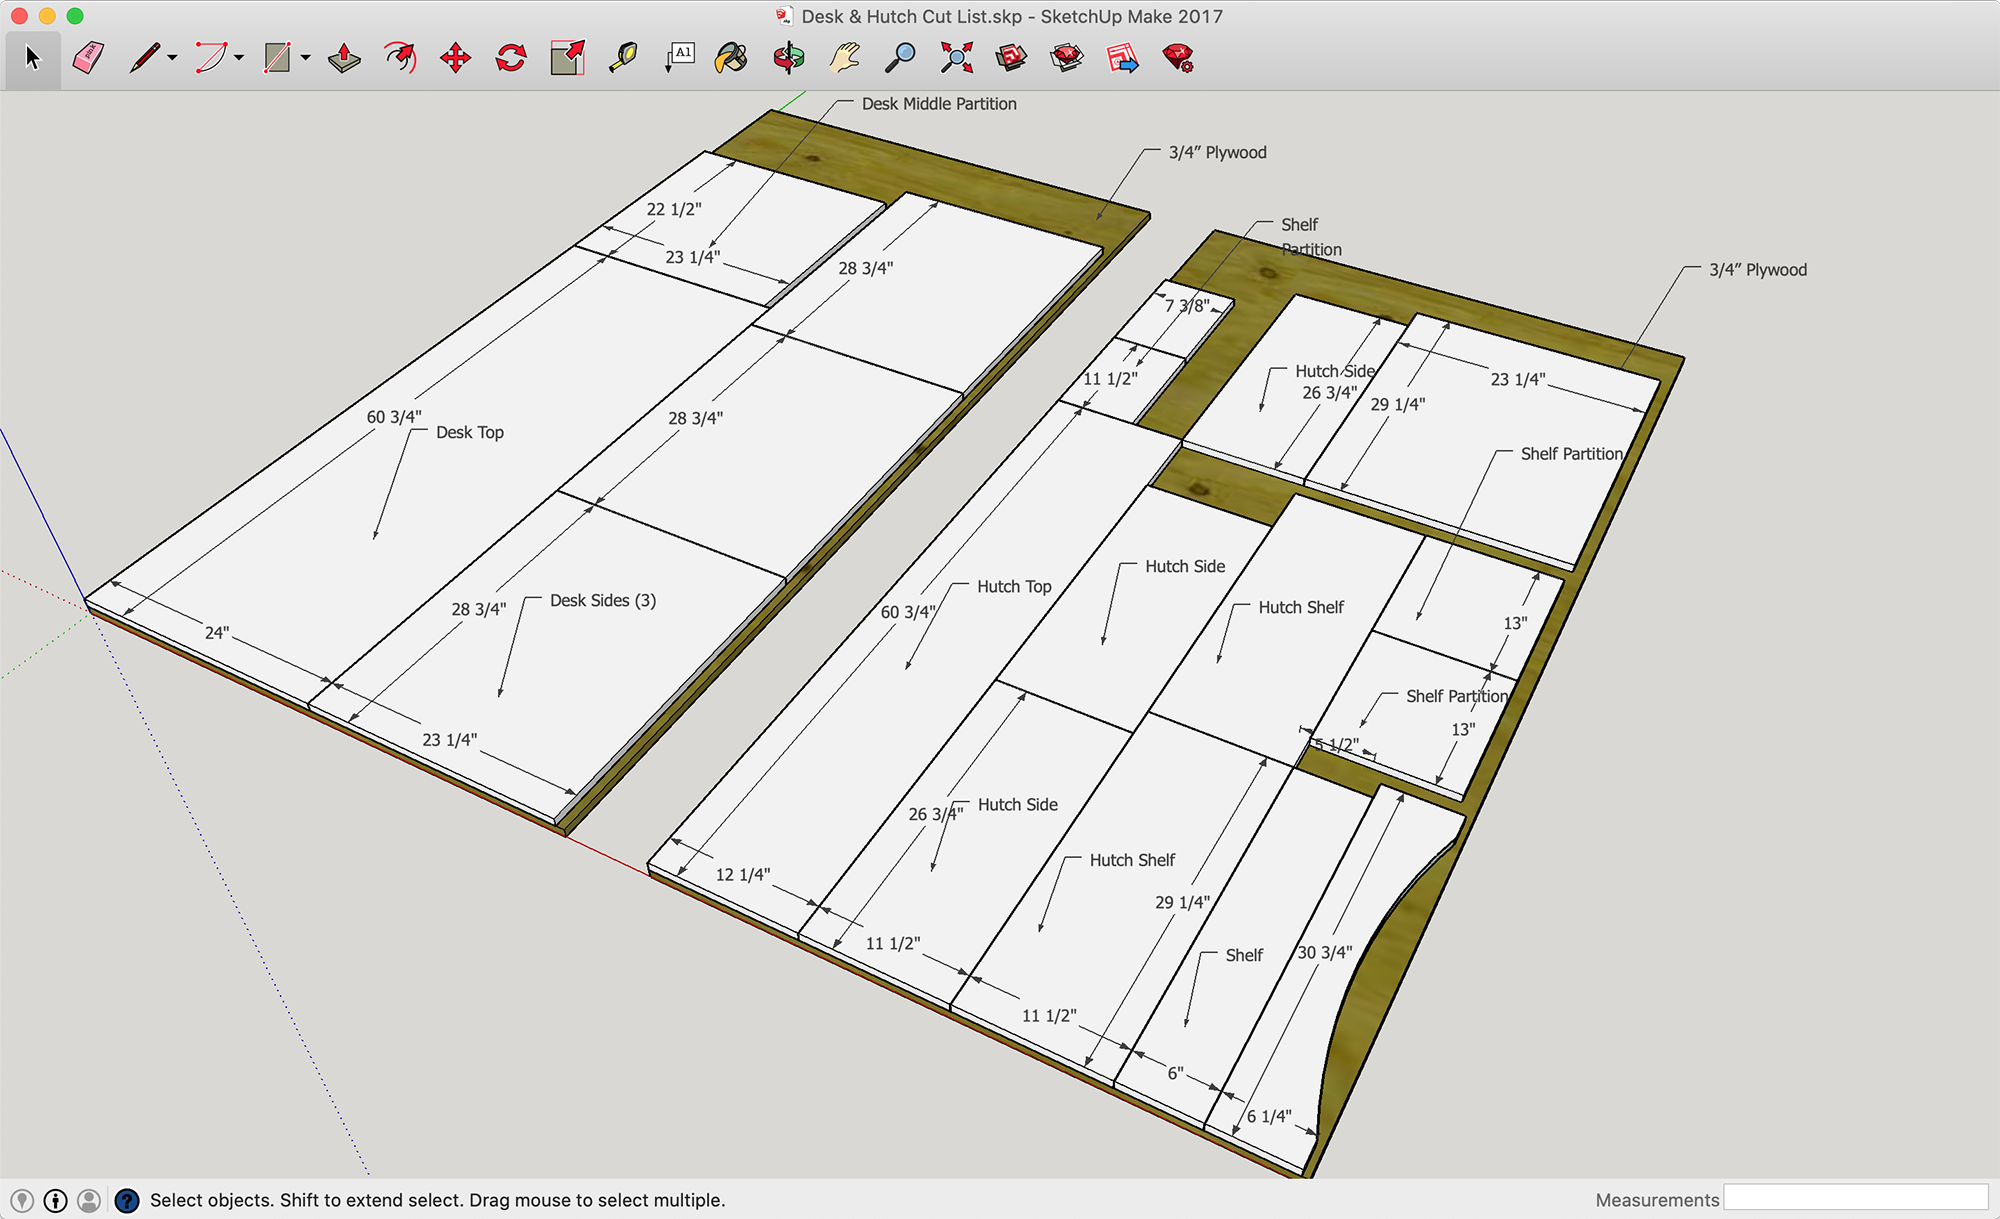

When making this cut list did you take in consideration of the blade thickness?
Hi Chris, yes the cut list does account for a standard 1/8 kerf table saw blade. The only place where it’s tight is on the plywood sheet with the hutch top, sides, and shelves. There’s 1/2″ of excess material on the sheet which is just enough for the 4 cuts required on that piece, so you need to be precise there. There’s ample room for all other cuts.
Thanks,
Ed
I don’t think there is a cut for the bottom portion of the drawer section. Looks like it should be 23 1/4 by 29 1/4.
Did I miss this in the cut diagrams?
No, actually I missed it in the cut diagram. Good catch. You will have enough material if you move your cuts for the 13″ x 11.5″ shelf partitions to the material beside the Hutch Shelf and make the cabinet base cuts in that area of the 2nd 3/4″ plywood sheet. Thanks for letting me know about that. You are correct about the dimensions of the cut.

hello im currently trying my luck with going to build this desk myself from scratch but was wondering if you could possibly send me a list of all the materials i will need to build this and use for building this please. Im trying something new and just being board in the house due to this corona. Thx and have a nice day and stay safe….
Hi Christan, thanks for the note. Here are the cut lists for the Harbor View desk & hutch project:
I was wondering if you have a full material list. I see the cut list below, just trying to figure out how much lumber total I’ll need. Thank you.
Hi Christian,
The materials are 2 full sheets of 3/4″ plywood, 2 sheets of 1/4″ plywood, a half sheet of 1/2″ plywood, 2 8′ 1×3 boards and approx. 240″ of 1/2 round moulding.
You’ll have a lot of excess on that 1/4″ plywood.
Thanks,
Ed
Wondering if the uprights are also pocket holed
Hi Peter, which uprights are you referring to? If you’re talking about the sides & divider of the main desk, yes, they are. If you’re referring to the dividers on the hutch, they are not. They can be attached from the top and bottom with brad nails (that’s what I recommend) or glued in place. You could pocket hole the longer ones, but it would probably be more trouble than it’s worth.